Hello Koders,
After a little research, I learned there is no Proper Guide for beginners to Start with Web API Integration in Kodular. So Here’s One ![]()
What is an API?
An API, or Application Programming Interface, is a set of rules that define how different software components can interact with each other. APIs allow different systems and applications to communicate with each other, share data and functionality, and work together to perform tasks.How Does an API Work?
An API Is usually Connected to a Data Source present in the Cloud or on the Internet that stores the information which the API Provides. Almost All APIs Use an API key to secure their data or monitor the usage. API keys are alphanumeric codes that must be input during an API Request. The API Uses majorly 2 Main Methods, GET & POST.-
The GET Method is Used when the user gets an output when details or tags of the information are provided.
Let us Understand this with an Example:
Let us Consider there is an API that provides us the News Headlines. It is Connected to a Data Source of an XYZ News Website. If we need the Sports news, the GET Method gives the command to get data with tags ‘sports’ in it or all the data in the ‘sports’ folder of the stored data.
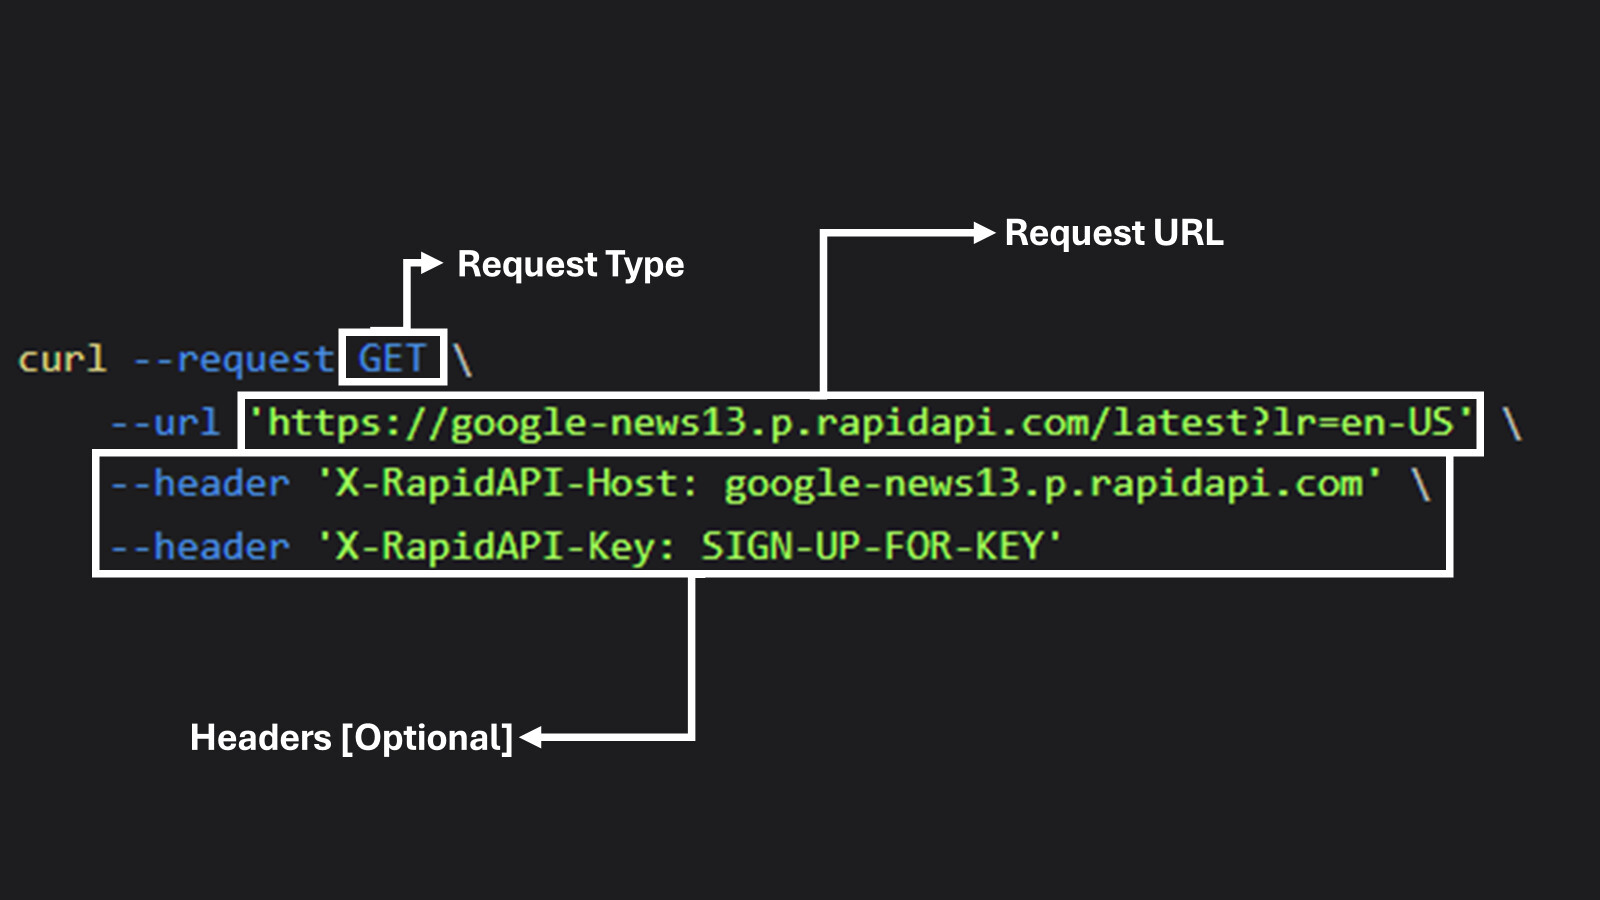
These are the Parts of GET API Request. The Parameter [here ‘Sports’] is usually input in the Request URL. The API Key is given through either the Request URL or through the Headers. -
The POST Method is used when the API processes some data (that is to be given by the user) & the user gets an Output based on the Data given.
Let us take an Example:
Let us Consider a CHAT-GPT API. Normally CHAT-GPT Provides the user an answer based on the question/ prompt given by the user. similarly, the API Uses POST Method where the User gives an input in the Request which then is processed by the API to give an Answer, back to the user. This data is usually in JSON format.
These are Parts of a POST API Request. The Data to be processed is put separately & is in JSON Format. Again, the API Key can be in the Request URL or the Headers.

How to Use API in Kodular?
API Requests in Kodular are Made through the WEB Component. The Web Component is an Invisible Back end Component used to Process web requests in the Code. The Following Blocks from the Web Component are needed for API Requests:
▶ Method 1: GET
For This Method, we Will Taking in Use The Google News API By BFD on Rapid API Hub:- First sign in to Rapid API and open the API page. Please Note that Some APIs might need to be Subscribed based on the Plans available. This is because the Data Collected is Sometimes months of hard work.
- Now, In the Code Snippet Find a Dropdown that is set Default to ‘(Node.js) Axios’. Click it and scroll Down to Find ‘Shell’ in that Select ‘cURL’. Now you will have a Better Understanding of What’s What.

- Now Copy the URL & the Headers into a Notepad to keep the data Together.
- In the Blocks set Web.URL to the Request URL of the API:
-
Set the Headers in the Form of the List as Shown Below. Make each header as a list with the name as the first element & next element as the Header Content. This list becomes an element of the main list of headers.
-
Now join both the blocks along with a Web. Get Function Block to Complete the Request.
-
Now With any Trigger of your choice, you can use the API using the GET Method
-
Now With any Trigger of your choice, you can use the API using the GET Method.


▶ Method 2: POST
For this method, we Will Use the CHAT GPT API by Matt R,
- Follow the steps from Step 1 – Step 5 of the GET Method.
- Now on the Web. Post Block, Put Your Content for example:
 [
    {
        "content": "Write an Essay on Impact of Technology",
        "role": "user"
    },

]

- Now put all the Blocks inside a suitable Trigger to make a POST Type API Request.
Formatting the API Response
Once the API Request is sent, The API Depending on the Method of Request performs the task and gives an output. This output Triggers the Event:

The Event Returns the Following Parameters:
• URL: Gives the Request URL
• Response Code: Gives the Status of the Output. Here are a Few Response Codes & their Meanings:

• Response Type: Tell in Which Format/Programming Language your Output is. Mostly, JSON is the Preferred Output Type.
• Response Content: The Output Which is given by the API. This is the Most Important thing for us
Here we will be Formatting the Data for the News API
- Check if the Response Code is 200. If yes then we can proceed further otherwise, we must give an alert about the Respective Error Occurred.

- Once we have a 200 Code, we can now format the JSON Output to Use as a List. This List can be a Local or Global Variable depending on the usage.

- The Format of the Output of the News API:

We Need the Title, Snippet, Timestamp, Publisher & one Image (thumbnail) from all the items (60 here).
4. So, we make 5 Global Variable as empty Lists.

- In the JSON, which we converted to a list, we got two Items in that one is ‘Status’ & other is a list of all items. We need the List ‘Items’. In this list, we have one news article as one item, & we need data from all these items, so we will put the list items in a for loop ‘for each item in the list’

- Now each item(article) is also a list of all the details we require, so we will select a particle item in the list order-wise:
• Title – 1
• Snippet – 2
• Publisher – 3
• Timestamp – 4
• Images – 6 - As for the first 4 items, they are a list [for example (title, Bridge Collapse)]. So, we will add the second item to their respective lists [so many lists
 ]
]

- For the Image we have two more items on the list we need the second item from the first list image list:

(since the image is the 6th item of the response list, we have put the index as 6 )
- Let’s Go. Now you have a List of all the things that were needed. Now Simply put the Wherever you want to.